

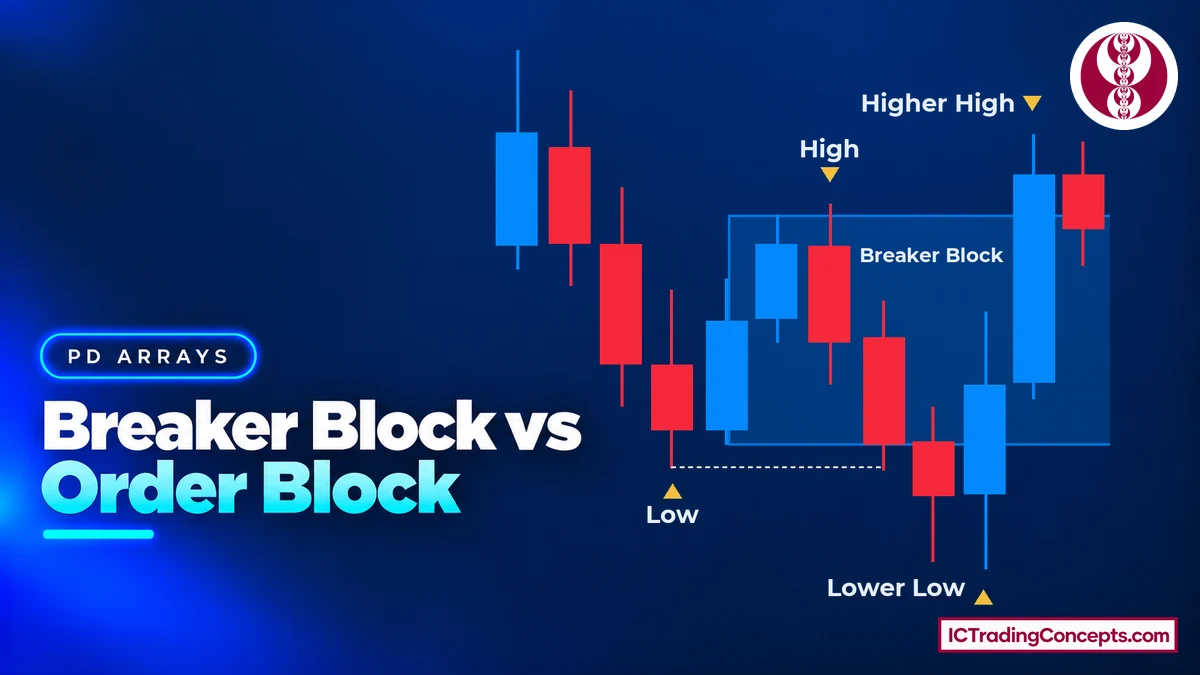
An Order Block (OB) is the last opposite-close candle, or series of candles, before a displacement that breaks market structure; it is marked with a single line at the open of the first candle in that series (or of the candle itself when there is only one), and when it holds, price continues in the same direction. A Breaker Block (BB) is an order block that failed: price first swept the liquidity beyond a prior low or high, then a candle body closed beyond the opposite swing, so the zone now works in the other direction; it is marked over the full range of its candle(s), wick to wick. A breaker block and order block can come from the very same candles, but the order block is a continuation level and the breaker block is a reversal zone.
Key Takeaways
- An order block is the last down-close candle(s) before an up move (bullish) or the last up-close candle(s) before a down move (bearish), followed by displacement that breaks structure.
- An order block is marked with one line at the open of the first candle in its series (or of its only candle); a breaker block is marked over the full range of its candle(s), wick to wick.
- A breaker block is a failed order block: a liquidity sweep first, then a body close beyond the opposite swing (above H for bullish, below L for bearish). Wicks do not count.
- No sweep before the break (a higher low instead of a lower low) means a mitigation block, not a breaker.
- The close creates the breaker; the trade comes only on the later retest of the zone.
What Is an Order Block (OB)?
An order block is the last opposite-close candle, or a short series of them, before a displacement that breaks market structure. "Opposite-close" means the candle closed against the move that follows: down-close candles before a rally, up-close candles before a sell-off. Displacement is a strong, fast move with large-bodied candles that carries price beyond a prior swing. Both terms in this comparison come from the teaching of ICT (Inner Circle Trader).
Two things make that candle an order block rather than just the last red or green candle on the screen: the strength of the move away from it and the structure break that move produces. Without both, there is no order block to mark. The usual explanation is that larger participants built positions in that area, which is why price can react when it returns; treat that as the reasoning behind the concept, not as a guarantee.
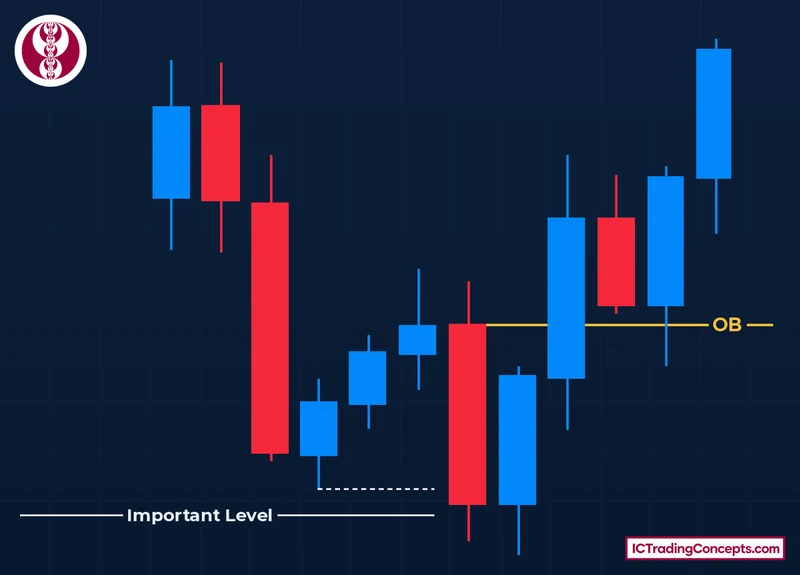
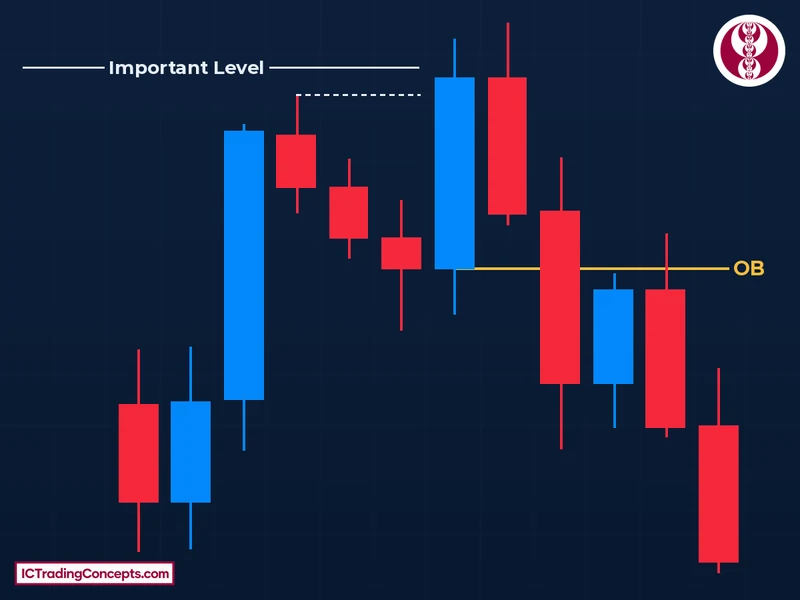
An order block is marked with a single line at the open of the first candle in that series; when the order block is a single candle, the line sits at that candle's open. When it holds, price comes back to that line, reacts and continues in the direction of the original displacement. That is its job: an order block is a continuation level.
Bullish Order Block
A bullish order block is the down-close candle, or series of down-close candles, before an up move that breaks above a prior swing high. A down-close candle opens at the top of its body, so the order block line sits at the top of the body of the first candle in the series. On a later pullback to the line, the order block is expected to act as support and send price higher again.


An order block does not require a liquidity sweep; the sweep in the examples below is context, not part of the definition.
Bearish Order Block
A bearish order block is the up-close candle, or series of up-close candles, before a down move that breaks below a prior swing low. An up-close candle opens at the bottom of its body, so the order block line sits at the bottom of the body of the first candle in the series. On a later rally to the line, the order block is expected to act as resistance and push price lower again.
How to Spot an Order Block on a Chart
Spotting an order block means working backward from a structure break, not forward from a candle that looks important. The sequence is the same for both directions:
- Find the structure break. Locate a swing high (or swing low) that price has broken with displacement.
- Trace the move to its origin. Follow the displacement back to the point where it started.
- Find the opposite-close candles. The down-close candle(s) right before the rally (bullish) or the up-close candle(s) right before the drop (bearish) are the order block; when several come one after another, the whole series is the order block.
- Draw the line at the open of the first candle in that series. When the order block is a single candle, draw it at that candle's open.
What Is a Breaker Block (BB)?
A breaker block is an order block that failed. The block first did its job and moved price, then the market swept the liquidity beyond the prior swing (L for a bullish breaker, H for a bearish one) and a candle body closed beyond the opposite swing. From that point the zone works in the opposite direction to the order block it came from.
All three of these conditions must be present, in this order:
- A valid order block. The candles must first have formed a real order block, with displacement and a structure break.
- A liquidity sweep. Price runs beyond the prior swing: a lower low below L (bullish) or a higher high above H (bearish).
- A body close beyond the opposite swing. For a bullish breaker, a candle body closes above H; for a bearish breaker, below L. A wick beyond the swing does not count.
For the sweep, trading beyond L (or H) is enough, even with a wick; only the confirmation needs a body close.
A breaker block is marked over the full range of its candle(s), from the highest wick to the lowest wick.


If the second condition is missing (a higher low instead of a lower low), the result is not a breaker but a different pattern, the mitigation block, explained in its own section further down.
Bullish Breaker Block
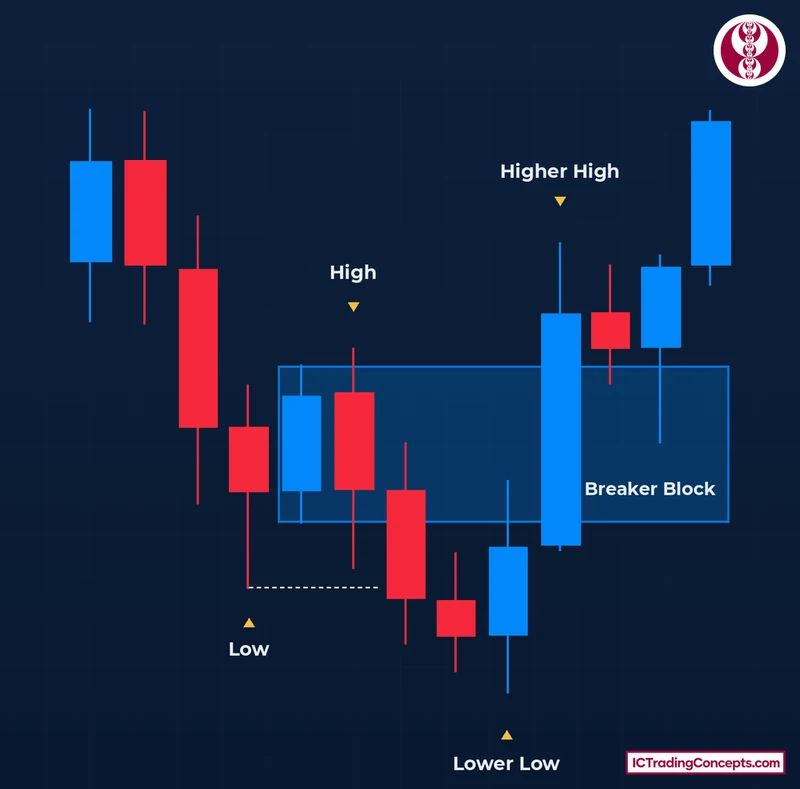
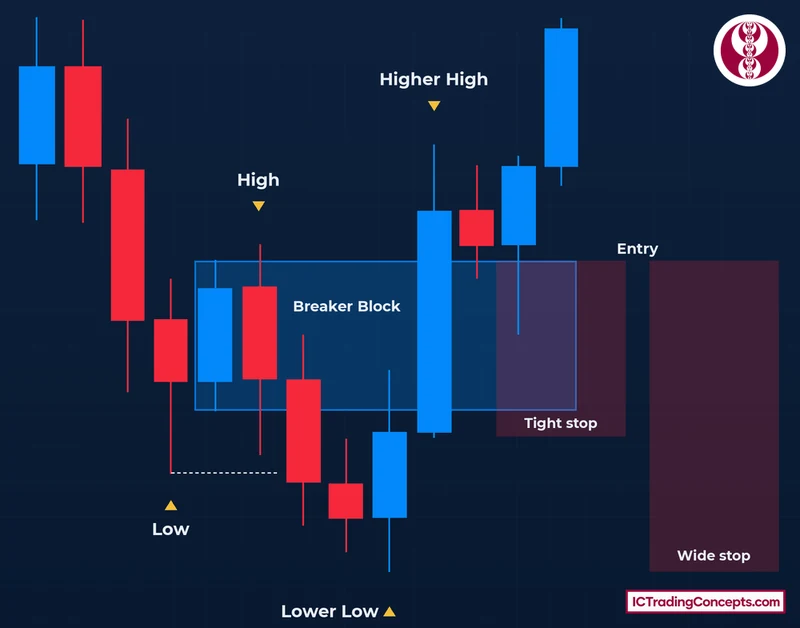
A bullish breaker block forms from the swing sequence low, high, lower low, higher high (L → H → LL → HH). Each step has a specific role:
- Price sets a low (L) and rallies to a high (H).
- The last up-close candle(s) at H, before the drop, form a bearish order block. It works at first, and price falls from it.
- The drop makes a lower low (LL) and sweeps the sell-side liquidity below L, the sell stop orders resting under that low.
- Price then rallies, and a candle body closes above H, making a higher high (HH).
The bearish order block at H has now failed. The full range of those up-close candle(s) becomes a bullish breaker block, and when price later returns to it from above, it is expected to act as support.
Bearish Breaker Block
A bearish breaker block follows the same logic in the other direction, through the sequence high, low, higher high, lower low (H → L → HH → LL):
- Price sets a high (H) and drops to a low (L).
- The down-close candles from H down to L, before the rally, form a bullish order block. Price rallies from it.
- The rally makes a higher high (HH) and sweeps the buy-side liquidity above H.
- Price then sells off, and a candle body closes below L, making a lower low (LL).
The failed bullish order block becomes a bearish breaker block, marked over the full range of those down-close candles. When price rallies back into it, the zone is expected to act as resistance.
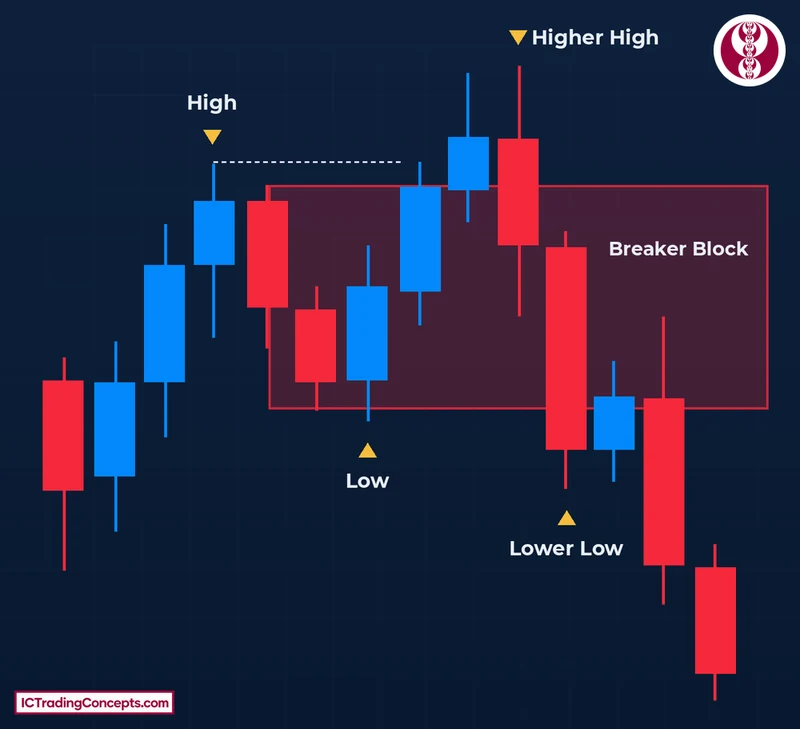
How to Identify a Breaker Block on a Chart (With Video)
A breaker block is confirmed only when every part of the sequence is visible on the chart. For a bullish breaker, check these points in order (reverse them for a bearish one):
- Is there a clear L → H → LL → HH sequence?
- Did the LL actually trade below L, sweeping the liquidity there?
- After that sweep, did a candle body close above H, not just a wick?
- Is the zone marked on the up-close candle(s) at H, full range, wick to wick?
If any answer is no, the zone is not a breaker block.
In the chart below, all four checks pass. The swing points are labeled L, H, LL and HH; the LL trades below the dotted line at L; the body of the HH candle closes above the dotted line at H; and the breaker zone covers the up-close candles at H, from the highest wick to the lowest.
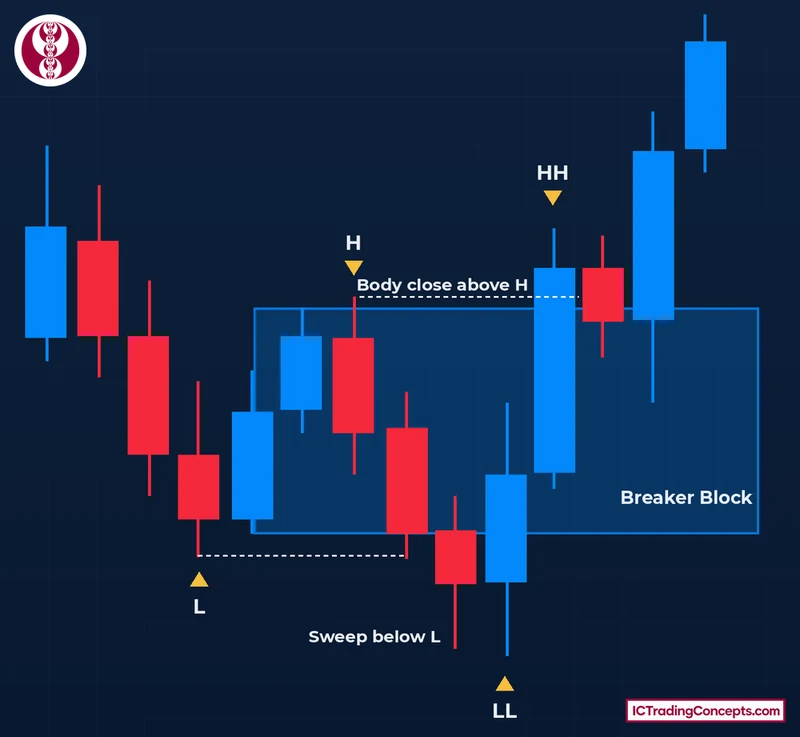
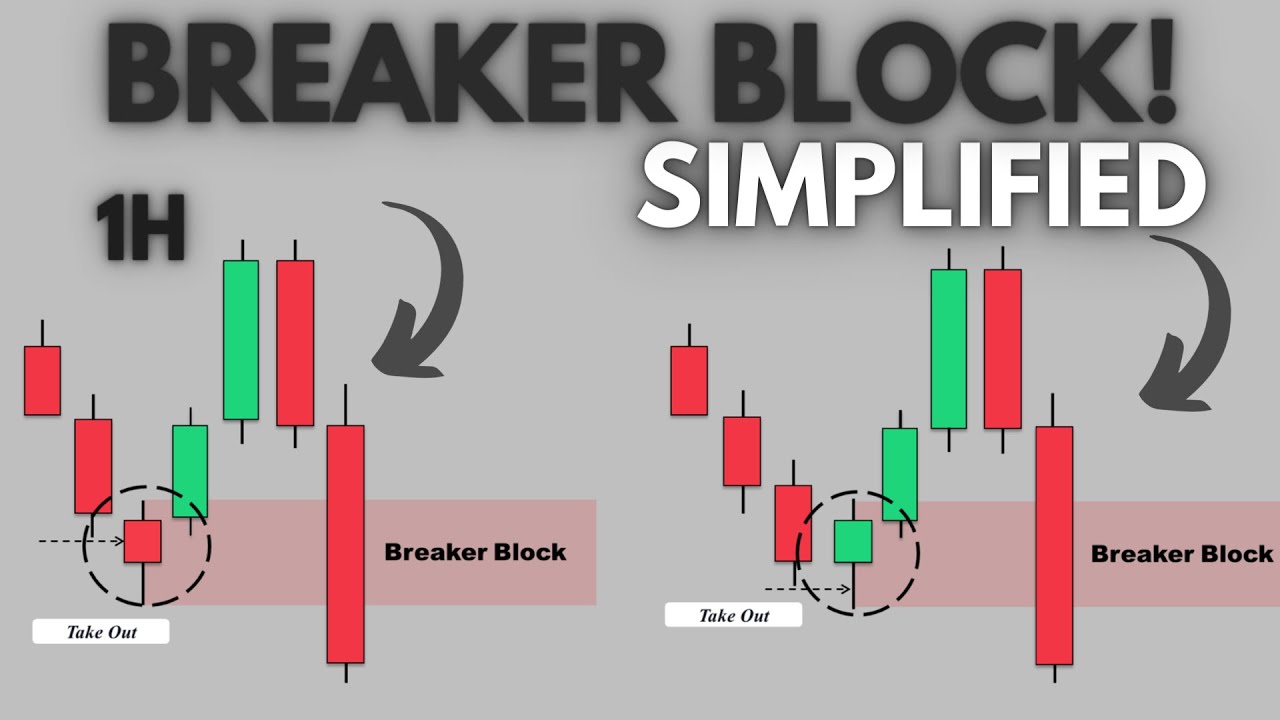
Watch: ICT Breaker Block Simplified
The video marks ICT breaker blocks on EUR/USD 5-minute and 15-minute TradingView charts. Check each one against the three conditions: order block, liquidity sweep, body close.
Why a Breaker Block Flips Support and Resistance
The flip explains why a breaker works in the opposite direction to the order block it came from. Take a bearish breaker: traders who bought from the bullish order block are holding losing positions after the close below L. When price returns to the zone, many of them use the retest to exit, while traders who read the new bearish structure sell at the same level. That mix of exits and fresh selling is the usual explanation for why old support now acts as resistance, a version of the role reversal between support and resistance. The bullish breaker is the same logic reversed: a failed bearish order block becomes support.


The sweep is what separates a breaker block from an ordinary support and resistance flip. Price first runs the stops beyond the prior swing, and only then closes through the opposite swing.
Breaker Block vs Order Block: The Core Differences
The ICT breaker block vs order block distinction comes down to one question: did the order block hold or fail? The answer also changes how the level is drawn: an order block is a single line at the open of the first candle in its series, while a breaker block covers the full range of its candle(s).
Continuation vs Reversal: The Difference That Matters Most
An order block that holds is a continuation level: price returns to it and resumes the direction of the displacement that created it. A breaker block is a reversal zone: the order block failed after a sweep and a body close beyond the opposite swing, and the zone now supports the new direction.
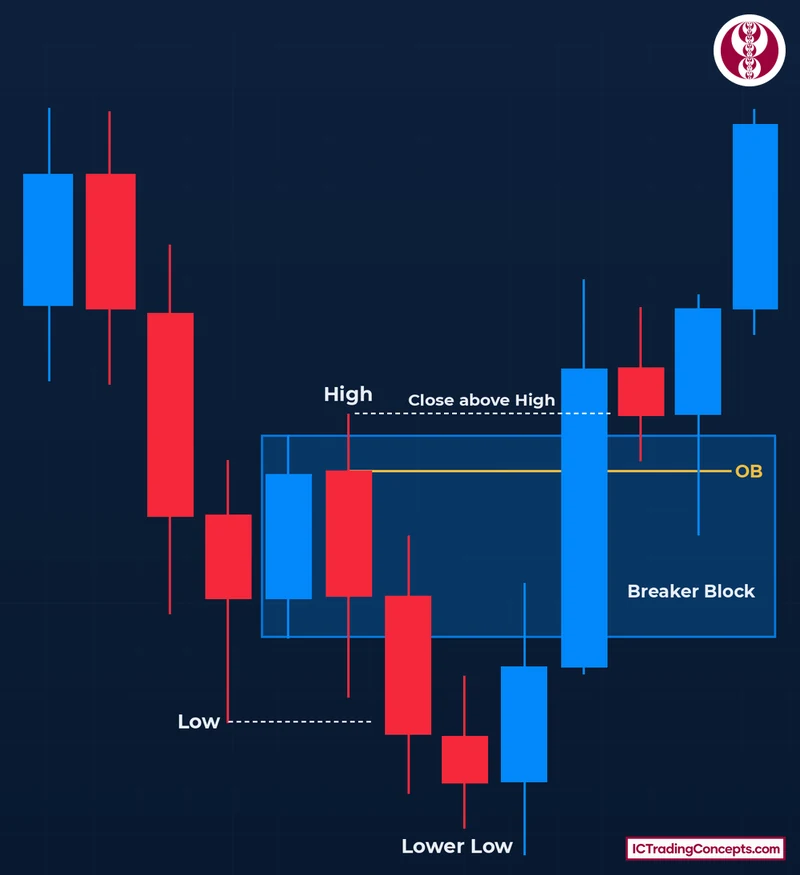
The same candles can turn from a bearish OB into a bullish breaker, or from a bullish OB into a bearish breaker. A bullish OB and a bullish breaker, however, are built from opposite-close candles. The up-close candles at H are a bearish order block while price is falling from them, and a bullish breaker block after the sweep of L and the body close above H. The candles stay the same; the structure around them changes, and so does the marking, from the open line to the full range.


Bullish Breaker Block vs Bullish Order Block
Both act as support, but they come from opposite candles and are drawn differently. A bullish order block is the series of down-close candles before the rally and is marked with a line at the open of the first of them. A bullish breaker block is built from the up-close candle(s) at a swing high that failed as resistance after a sweep of the low, and it is marked over their full range.
The candle color flips between the two: down-close candles for the bullish order block, up-close candles for the bullish breaker block.
The chart below shows both on the same move. The breaker block is the blue up-close candle just before the High: it failed after the sweep of the Low and the close above the High, so the box covers its full range. The order block is the three red down-close candles that follow it, which carry price below the Low before the rally; the OB line sits at the open of the first of them. Because that series starts right after the up-close candle, the OB line falls inside the breaker range here: the same price area, built from different candles and marked in a different way.


Bearish Breaker Block vs Bearish Order Block
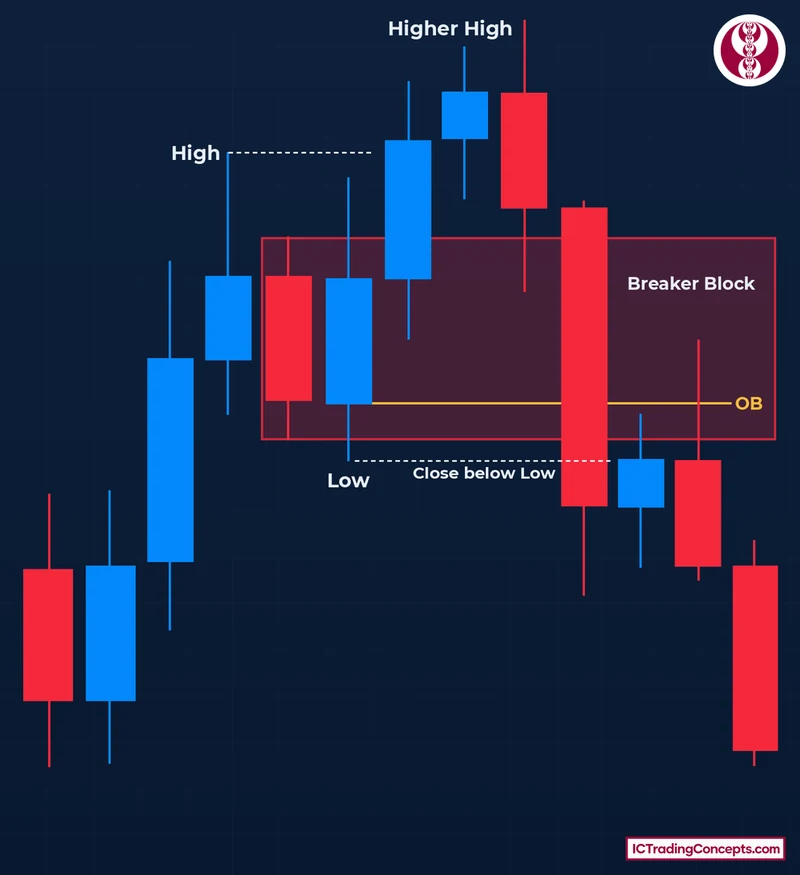
The bearish pair mirrors the bullish one. Both act as resistance, but they come from opposite candles and are drawn differently. In the sequence, H is the first swing high and HH is a later, higher high: here the HH is the sweep, the run above H that takes the buy stops resting there.
| Bearish Order Block | Bearish Breaker Block | |
|---|---|---|
| Candles | The up-close candle(s) before a drop that broke structure downward | The down-close candles from H down to L, the bullish order block that failed |
| Sequence | Up-close candle(s), then displacement below a swing low | High (H) → low (L) → higher high (HH) that sweeps above H → body close below L |
| Marked as | One line at the open of the first up-close candle in the series | Full range of the down-close candle(s), wick to wick |
| Role | Resistance in a downtrend that is continuing | Resistance in a downtrend that has just begun |
The chart below shows both on the same move. The bearish breaker block is the red down-close candle just before the Low: it failed after the sweep of the High and the close below the Low, so the box covers its full range. The bearish order block is the three blue up-close candles that follow it, which carry price above the High before the sell-off; the OB line sits at the open of the first of them. Because that series starts right after the down-close candle, the OB line falls inside the breaker range here, just as in the bullish example.
Side-by-Side Comparison Table
The table sums up the differences above in one place, as a quick reference. L and H are the first swing low and swing high; LL (lower low) and HH (higher high) are the later swings beyond them. The last row shows the no-sweep case, the mitigation block, which belongs to neither and is explained further down.
| Criterion | Order Block (OB) | Breaker Block (BB) |
|---|---|---|
| What it is | Last opposite-close candle(s) before a displacement that breaks structure | An order block that failed after a liquidity sweep and a body close beyond the opposite swing |
| Bullish form | Last down-close candle(s) before the up move | Up-close candle(s) at H, after L → H → LL → HH |
| Bearish form | Last up-close candle(s) before the down move | Down-close candles from H down to L, after H → L → HH → LL |
| Liquidity sweep | Not part of the definition | Required first (LL below L, or HH above H) |
| What confirms it | Displacement and a structure break in the direction of the move | A body close above H (bullish) or below L (bearish) after the sweep; wicks do not count |
| How it is marked | One line at the open of the first candle in the series | Full range of the candle(s), wick to wick |
| Role | Continuation | Reversal |
| Mitigation Block | The up-close candle(s) at H that started the drop (bearish: the down-close candle(s) at L that started the rally), broken without a sweep: a higher low instead of a lower low, or a lower high instead of a higher high. A separate case, not a breaker | |
How Does an Order Block Turn Into a Breaker Block?
Every breaker block starts life as an order block, so the two concepts meet in one sequence. The conversion always happens in this order:
- The order block forms and works. Price leaves it with displacement and breaks structure.
- Price sweeps the prior swing. The move runs beyond it (below L for a bullish breaker, above H for a bearish one) and takes the liquidity there.
- A candle body closes beyond the opposite swing: above H for a bullish breaker, below L for a bearish one.
- The order block has failed, and its candle(s) are now a breaker block, marked over their full range.
An order block becomes a breaker block only when this whole sequence is complete. A wick is not a close: if price spikes beyond the swing but the candle body closes back on the other side, the sequence is not complete.
Formation is also not entry. The close that completes the sequence creates the breaker; the trade, if there is one, comes when price returns to the zone later.
What Is a Mitigation Block?
A mitigation block is the origin of a swing that failed without sweeping liquidity. A candle body closes beyond the opposite swing, just as when a breaker forms, but price never ran beyond the prior swing first. In a bullish setup, the zone is the up-close candle(s) at H that started the drop, and the drop makes a higher low (HL) instead of a lower low (LL) before price closes above H.
Is It a Breaker Block or a Mitigation Block?
The missing sweep is the key difference between the two, and it decides the name: a failed order block becomes a breaker only if the sweep comes first. In bullish terms, the mitigation sequence is low, high, higher low, higher high (L → H → HL → HH):
- Price sets a low (L) and rallies to a high (H).
- Price drops from H. The up-close candle(s) at H that started the drop are the candles to watch.
- The drop stops above L, making a higher low (HL). The sell-side liquidity below L is never taken.
- Price then rallies, and a candle body closes above H.
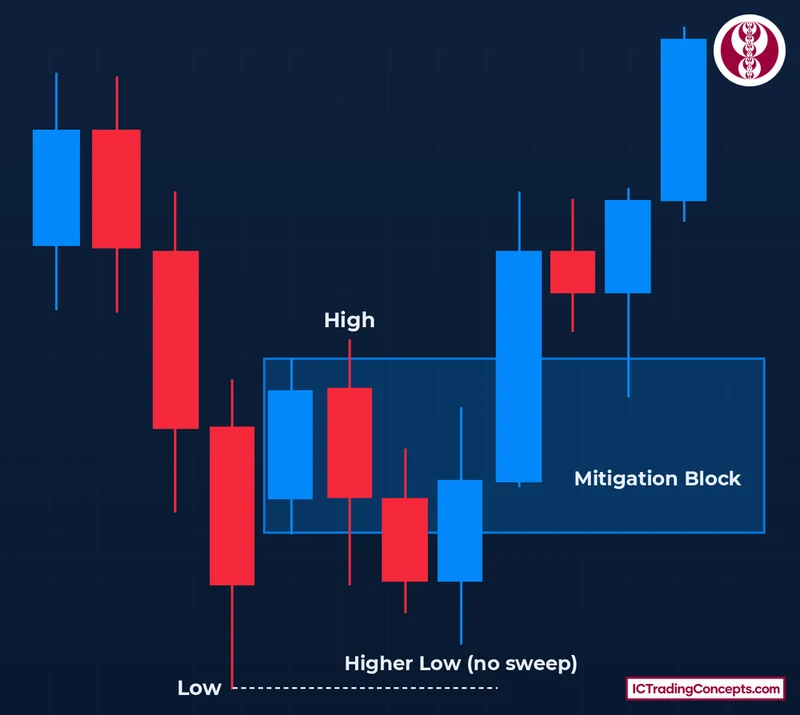
The up-close candle(s) at H that started the drop have failed as resistance, as in a bullish breaker, but without the sweep in step 3 they form a mitigation block, not a breaker block. The bearish version mirrors it, through high, low, lower high, lower low (H → L → LH → LL): the rally stops below H instead of sweeping it, and a candle body then closes below L.
Was liquidity swept before the body close beyond the opposite swing?
- Swept, then closed → Breaker
- Closed without a sweep (HL/LH) → Mitigation
- No close, price continued → Order Block
What Makes a Breaker Block or Order Block Worth Trading?
The definition tells you whether a breaker or an order block exists; context tells you whether it deserves your attention. Displacement and a structure break are always required for an order block; the points below are about how strong and clear they are, along with other context that makes a valid setup cleaner to trade.
Conditions That Strengthen an Order Block
These points make an order block easier to trust as a continuation level:
- Strong displacement. Large-bodied candles leaving the order block quickly show the move had real momentum behind it.
- A clean structure break. The move closes beyond an obvious swing, not a minor one.
- A first return. An order block that price has not traded back to yet is usually treated as cleaner than one that has already been tested.
- Alignment with the current structure. An order block formed on a pullback in the direction of the prevailing structure fits its continuation role.
Conditions That Strengthen a Breaker Block
For a breaker block, the extra context sits around the sweep and the close:
- An obvious swept swing. A sweep of a clear, well-defined low or high, where stops are likely to rest, carries more meaning than a sweep of a minor swing.
- A decisive close. A strong body close beyond the opposite swing, with displacement, says more than a hesitant close just past it.
- The first retest after conversion. The first return to the zone is the cleanest test of the flip.
- A compact zone. A narrower zone allows a tighter stop just beyond it, which improves the reward relative to the risk.
How to Trade the Breaker Retest
In breaker block vs order block trading, the breaker gives a reversal trade in three parts: an entry on the retest, a stop in one of two places, and a target set by a fixed R multiple or a leg projection. The steps below use a bullish breaker; reverse them for a bearish one.
Entry: Wait for the Retest
The candle that closes above H creates the breaker; it is not the entry. Wait for price to come back into the breaker zone after the higher high, and take the long as price trades back into it. If price never returns to the zone, there is no trade.
Stop Loss: Beyond the Zone or Beyond the Swept Swing
There are two places for the stop, and the choice is a trade-off between room and risk:
- Just beyond the breaker zone (tighter). For a bullish breaker, just below the zone's low. The risk per trade is smaller, so the same target is a larger multiple of R, but price has less room to move.
- Beyond the swept swing (wider). For a bullish breaker, at or just below the LL that swept L. The trade gets more room, but the target has to be further away to keep the same reward relative to the risk.
Targets: Fixed R or Leg Projection
The target can be set in one of two ways:
- Fixed R. Set the target at a multiple of the risk, such as 2R or 3R.
- Leg projection. Measure the manipulation leg, the move from H down to the LL that swept L, and project the same distance beyond H in the new direction.
A Worked Example With Prices
The numbers below are illustrative, chosen to show the arithmetic of a bullish breaker trade on EUR/USD with the tighter stop and a 3R target.
| Step | Level |
|---|---|
| Swing low (L) | 1.0820 |
| Swing high (H) | 1.0880 |
| Breaker zone: up-close candle at H, full range | 1.0862 to 1.0880 |
| Lower low (LL), sweeping below L | 1.0806 |
| Break: body close above H | 1.0889 |
| Entry on the retest, at the top edge of the zone | 1.0880 |
| Stop, just below the zone | 1.0858 (risk: 22 pips) |
| Target at 3R | 1.0946 (reward: 66 pips) |
The trade only exists because the low at 1.0820 was swept first. Had the drop stopped at 1.0830 (a higher low) before price closed above H, the same candle at H would have been a mitigation block rather than a breaker.
Common Mistakes With Breaker Blocks and Order Blocks
Most errors come from calling a zone by the wrong name, which then points the trade in the wrong direction.
- Calling every failed order block a breaker. Without a sweep of the prior swing first, the failed swing is a mitigation block, not a breaker block.
- Counting a wick as the close. A wick beyond the opposite swing does not complete the sequence; only a candle body closing above H (bullish) or below L (bearish) does.
- Entering on the close candle. The close creates the breaker. The entry comes later, on the retest of the zone.
- Drawing both the same way. The order block is one line at the open of the first candle in its series; once it becomes a breaker (sweep + body close), the breaker block is the full range of its candle(s), wick to wick.
- Marking every strong candle as an order block. Without displacement and a structure break, there is no order block, and a chart full of marked levels leads to low-quality trades.
- Treating a first touch as proof the level holds. Price can react briefly and then continue straight through. A touch is a test, not a confirmation, and the stop defines the risk either way.
Indicators on TradingView
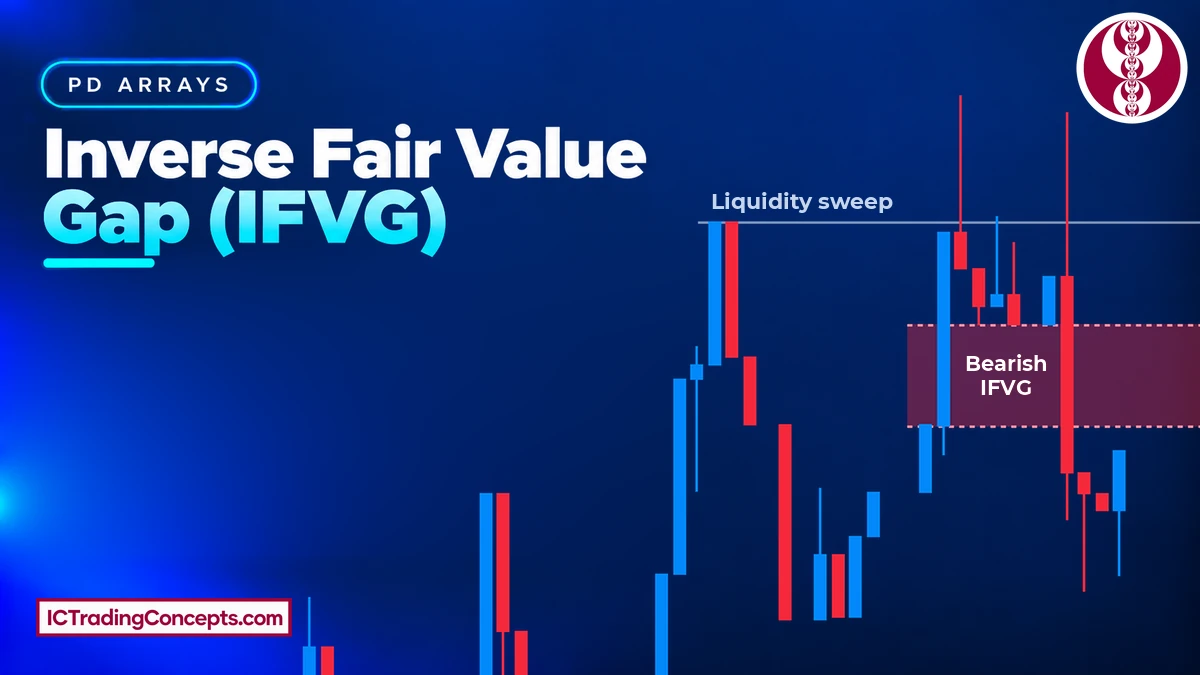
Indicators can mark these zones automatically, which saves time when scanning several charts. Check every automatic breaker label against the sweep and body-close sequence above before you use it, and note that these tools may draw order blocks as zones rather than the open line.
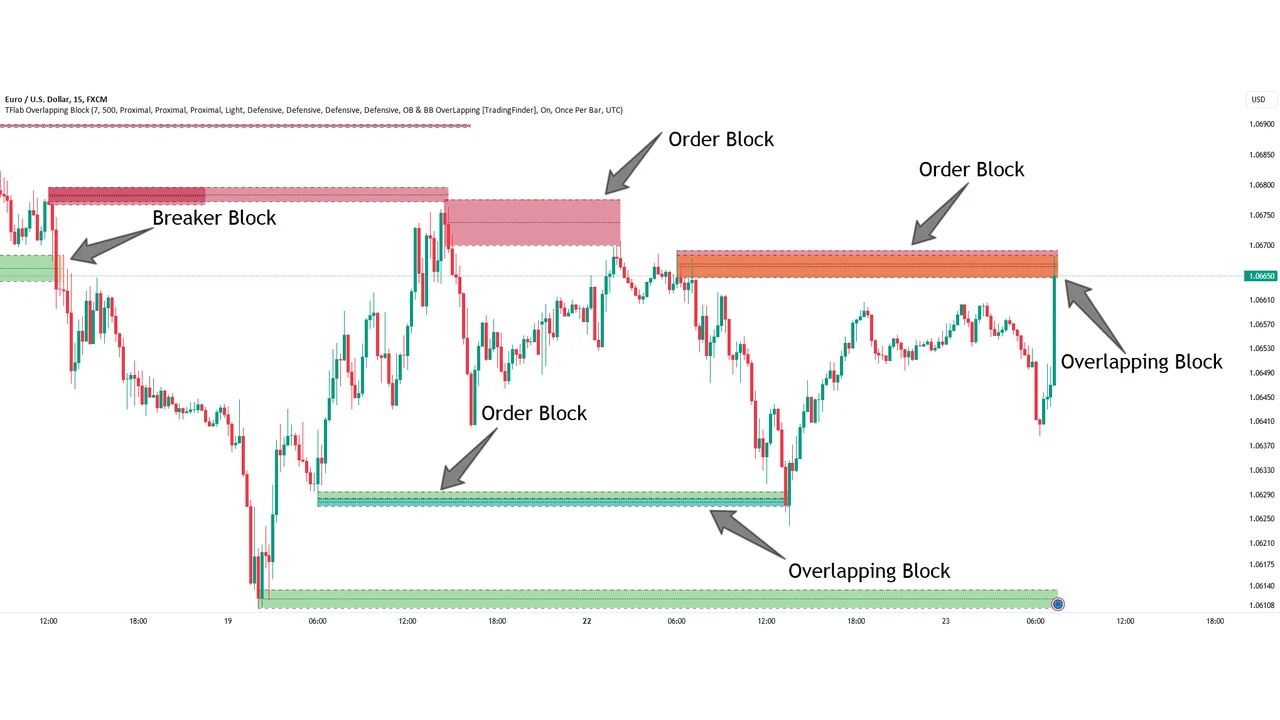
Breaker Blocks + Order Blocks confirm [TradingFinder] BBOB Alert
Marks order blocks and breaker blocks on the chart and highlights where the two overlap.
View on TradingView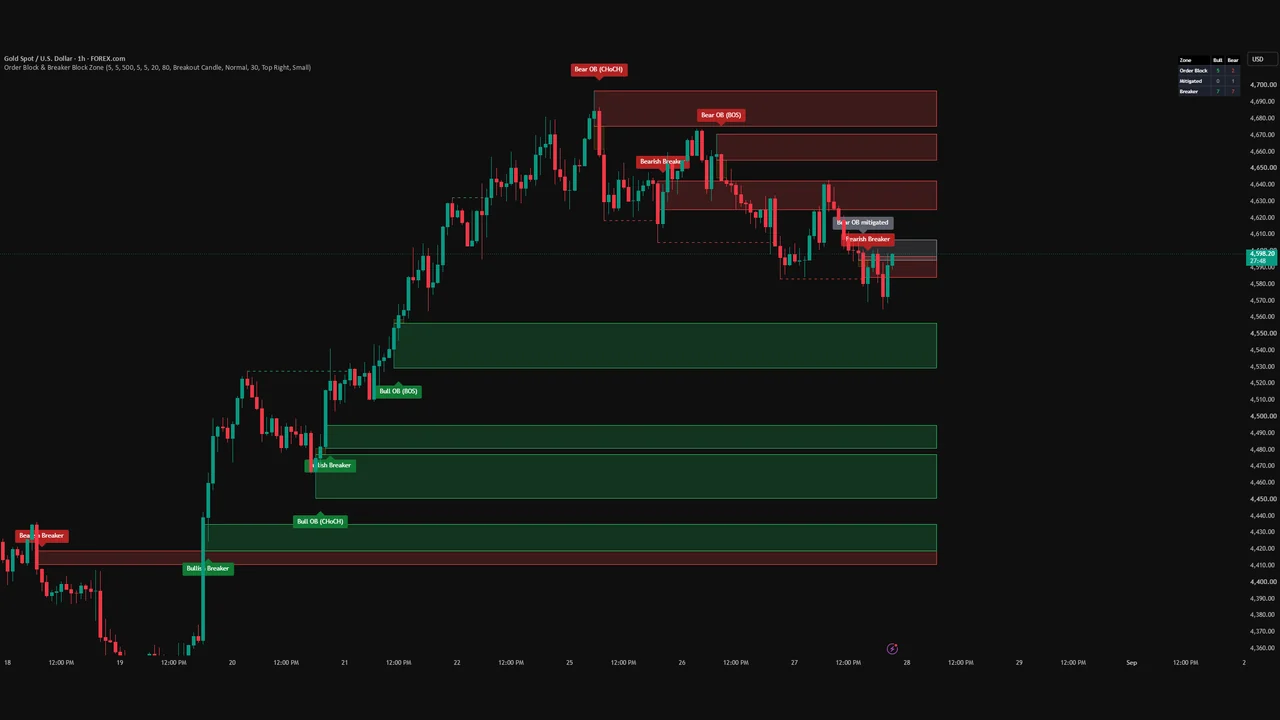
Order Block & Breaker Block Zone (RWBTradeLab)
Marks order block zones and labels the ones that become breaker blocks.
View on TradingView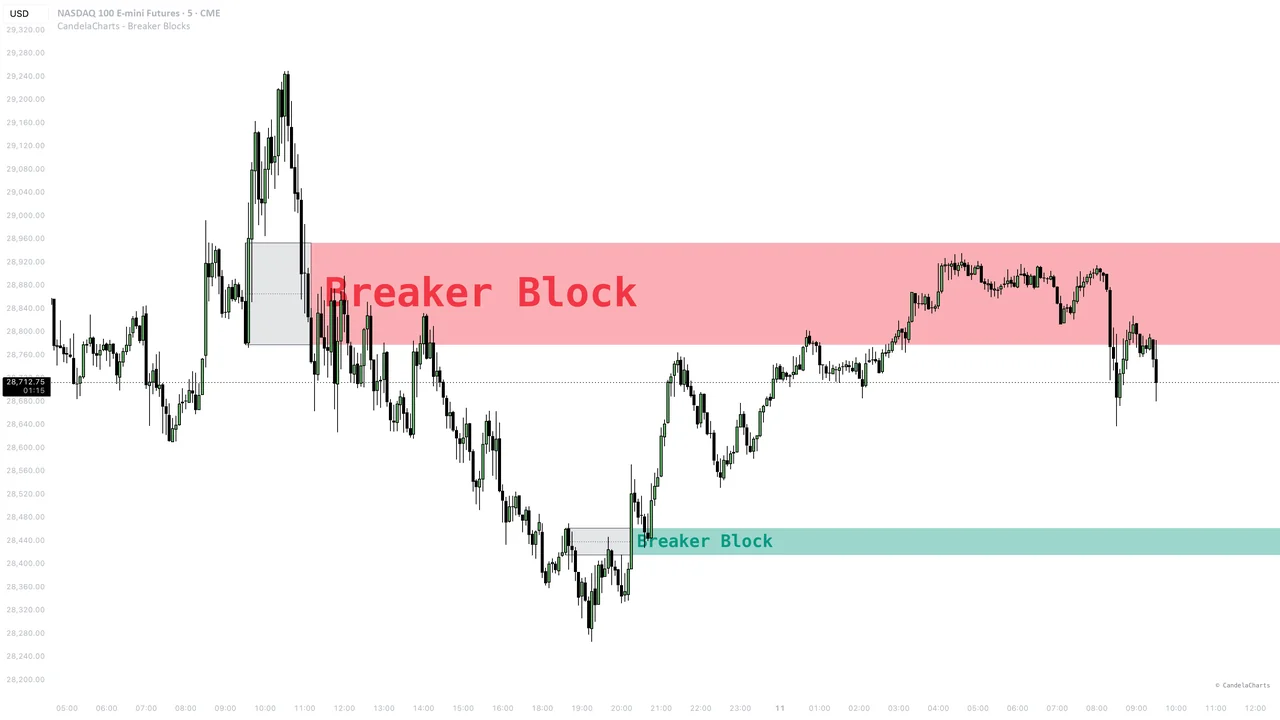
CandelaCharts - Breaker Blocks
Marks breaker blocks that form after price sweeps a prior high or low and then reverses.
View on TradingViewTest Your Breaker Block vs Order Block Knowledge
Eight quick questions on marking each zone, the three breaker conditions, the mitigation block and the retest entry. Each answer links back to the section that explains it.
ABCD Answer with your keyboard
-
01How is an order block marked on the chart?
An order block is marked with one line at the open of the first candle in its series, or at the open of its only candle. The full wick-to-wick range is how a breaker block is marked. Review: What Is an Order Block (OB)?
-
02Which three conditions must be present, in this order, for a breaker block?
A breaker is a failed order block: the block must first be valid, price must sweep the prior swing, and then a candle body must close beyond the opposite swing. A wick beyond that swing does not count. Review: What Is a Breaker Block (BB)?
-
03Which swing sequence forms a bullish breaker block?
A bullish breaker forms from low, high, lower low, higher high. L → H → HL → HH has no sweep, so it is a mitigation block, and H → L → HH → LL is the bearish breaker sequence. Review: this section
-
04Price makes a higher low (HL) instead of a lower low, then a candle body closes above H. What has formed at H?
Without a sweep of the prior low, the failed swing is a mitigation block, not a breaker. A breaker needs the lower low that takes the liquidity below L before the body close above H. Review: this section
-
05After the sweep of L, a wick spikes above H but the candle body closes back below it. What is the status?
Only a candle body closing beyond the opposite swing completes the conversion. A wick that spikes past H while the body closes back below it leaves the sequence incomplete. Review: How Does an Order Block Turn Into a Breaker Block?
-
06What role does each zone play once it is confirmed?
An order block that holds sends price on in the direction of its displacement. A breaker block is the failed order block, so it works in the opposite direction and supports the new move. Review: this section
-
07When is the entry on a bullish breaker block taken?
The close above H creates the breaker; it is not the entry. The long is taken when price comes back into the zone, and if price never returns, there is no trade. Review: this section
-
08Which statement about the two stop placements for a breaker trade is accurate?
The tighter stop just beyond the zone means a smaller risk, so the same target is a larger R multiple, but price has less room. A stop beyond the swept swing gives more room and needs a farther target to keep the same reward to risk. Review: this section
Review your answers
Conclusion
An order block and a breaker block can come from the same candles, so the name depends on what price did next. If the order block holds and price continues, it is a continuation level: the last opposite-close candle(s) before a structure-breaking displacement, marked with a line at the open of its first candle. If price sweeps the prior swing and a candle body then closes beyond the opposite swing, the failed order block becomes a breaker block: a reversal zone marked over the full range of its candle(s). Without the sweep, the failed swing is a mitigation block. For a breaker, the body close confirms the conversion; in every case the trade comes on a later return to the level.
Sources
- ICT Mentorship Core Content, Month 04, ICT Breaker Block: ICT, YouTube
- Support and resistance: Wikipedia
Be the first to share your thoughts on this article.