

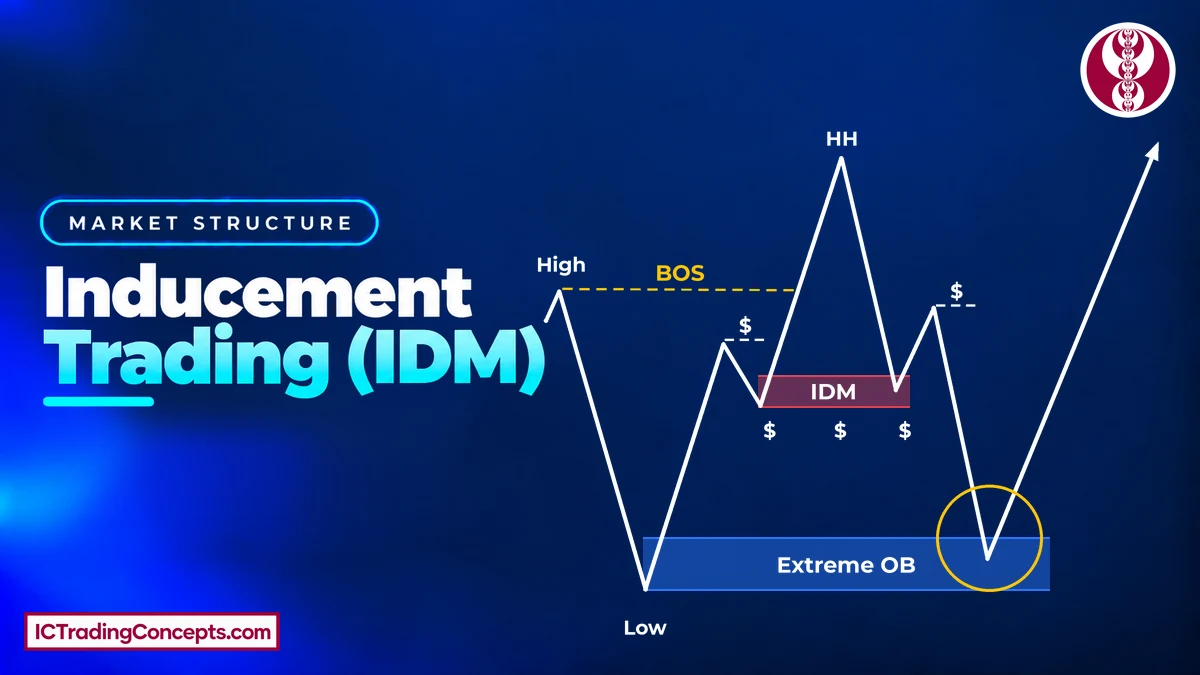
Inducement (IDM) in trading is the last valid pullback inside the impulse leg that made a break of structure (BOS) or a change of character (CHoCH). In a bullish leg, the inducement is the low of that pullback. In a bearish leg, it is the high. Smart Money Concepts (SMC) traders wait for price to take this level before they accept the new high or low as a confirmed swing. Only then do they look for an entry at the extreme order block where the leg began.
Key Takeaways
- Inducement in trading marks the last valid pullback before the break: its low in a bullish leg, its high in a bearish leg.
- Price takes the IDM with a wick sweep or a body close. Both count. The BOS itself still needs a body close.
- Until the IDM is taken, the new high or low is still internal, so a close beyond it is not a BOS.
- The order block at the IDM is the trap. The valid point of interest (POI) is the extreme order block at the origin of the leg.
- The trade waits for the IDM to be taken and for price to reach the extreme POI. The stop goes beyond the POI, and the target is the external high or low.
What Is Inducement in Trading?
Inducement is an SMC term for a level that draws traders into a position too early. The name describes what it does: it induces early buyers or sellers, often retail forex traders, to act at the wrong zone. In SMC, inducement is not just any level on the chart. It is one specific point inside market structure.
Price moves in impulse legs and corrections. An impulse leg is a strong move in the direction of the trend, built from small internal pushes and pullbacks. In a bullish leg, a valid pullback forms when price breaks and closes below the latest bullish candle; in a bearish leg, it forms when price closes above the latest bearish candle. When the leg breaks structure, look back into it and find the last pullback before the break. The extreme of that pullback is the IDM.
Traders who buy that pullback in a bullish leg usually place their stops just below its low. Price often comes back, takes that low and triggers those stops before it reaches the zone where the leg began. That is the inducement meaning in trading: a level to wait for, not a level to trade.
How Inducement Forms Inside the Impulse Leg
Inducement forms in three steps: an impulse leg, a pullback inside it, and a push that breaks structure. Price is then expected to return and take the IDM.
Bullish Inducement
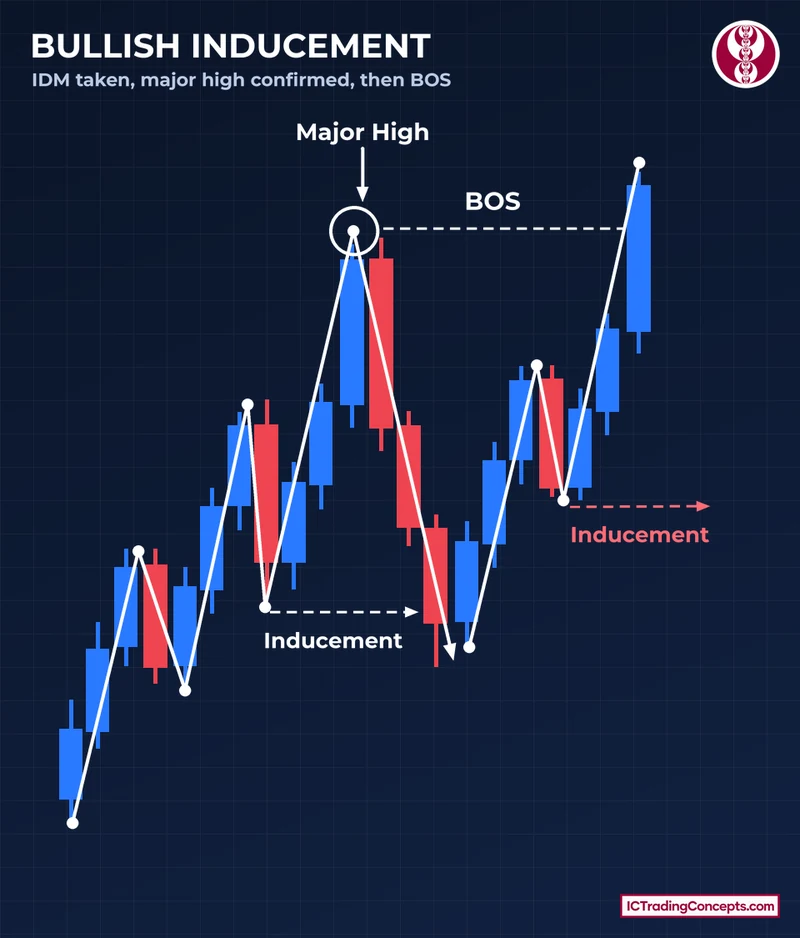
In an uptrend, the impulse leg climbs with small internal pullbacks until it stalls at a high. Price then retraces and takes the low of the last pullback in that leg. This is the inducement being taken, and it confirms the top of the leg as a major high.


Bearish Inducement
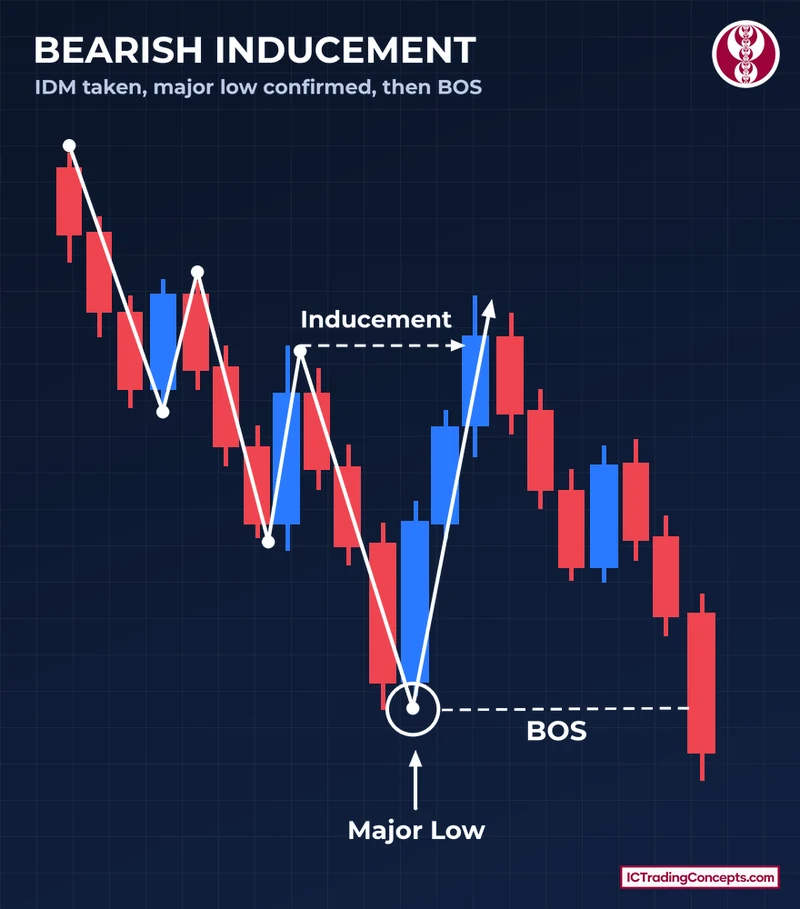
A downtrend mirrors this. The impulse leg falls with small internal rallies. Price then retraces upward and takes the high of the last pullback, which confirms the bottom of the leg as a major low.
Types of Inducement: CHoCH Leg and BOS Leg
There are two types of inducement, named after the break that the leg produced. The marking rule is the same in both; only the context changes. A CHoCH leg starts a possible new trend, while a BOS leg continues the current one.
Inducement in a CHoCH Leg
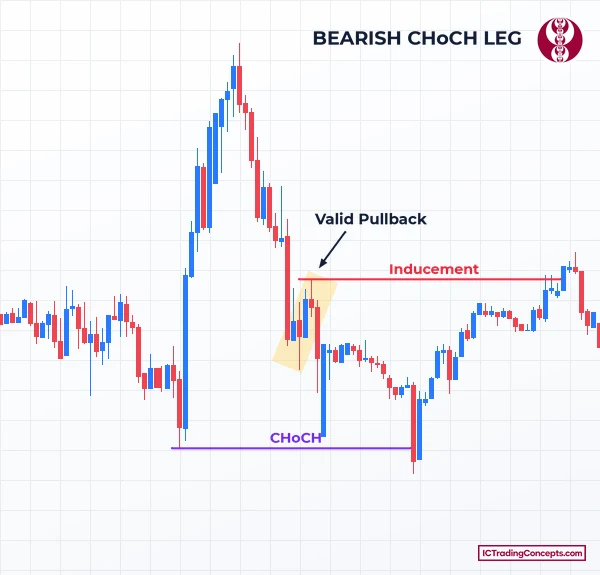
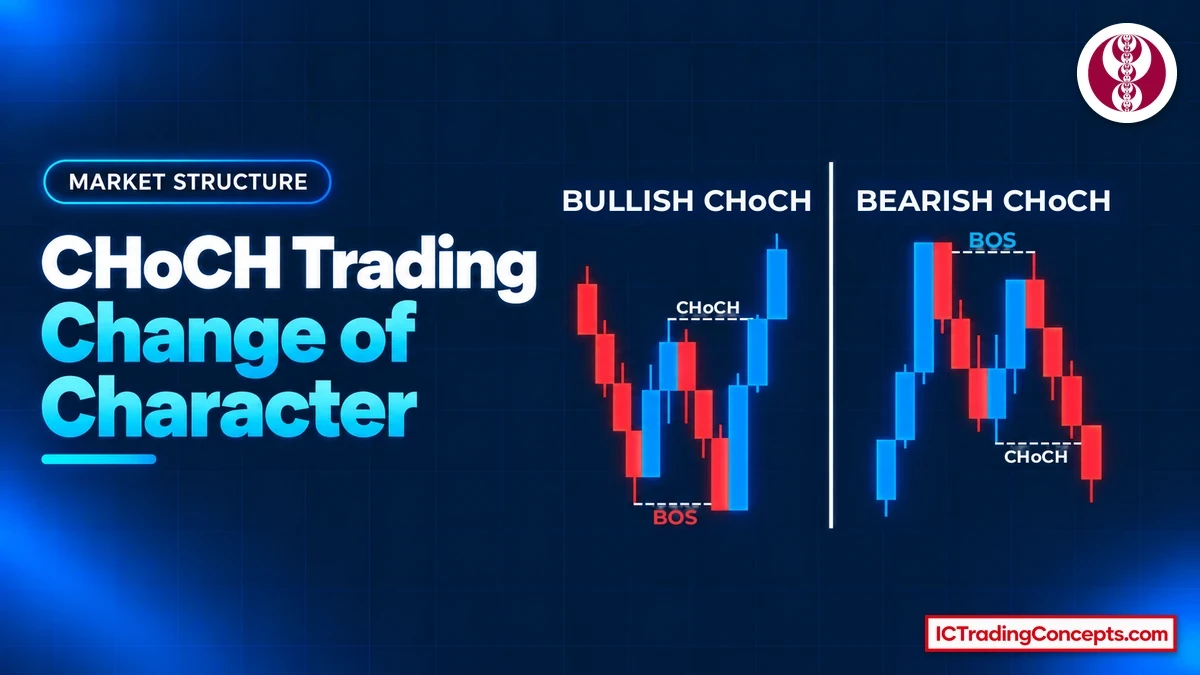
A change of character is the first body close beyond the protected swing, against the old trend. The rules for marking that break are covered in CHoCH trading. The leg that made the close holds the IDM.
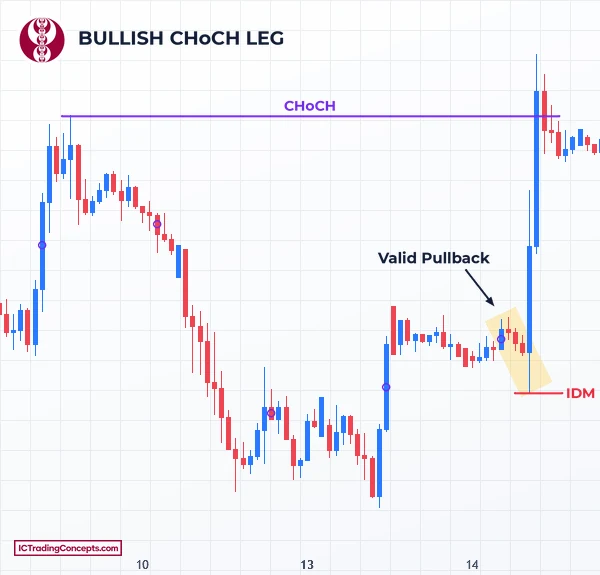
In a bullish CHoCH, the rally closes above the protected lower high of the downtrend. Find the last pullback in that rally. Its low is the IDM, and the first high of the new uptrend is not confirmed until price takes it.
In a bearish CHoCH, the drop closes below the protected higher low of the uptrend. The pullback to look for is a small rally inside that falling leg. That high is the level to watch, and the first low of the new downtrend stays unconfirmed until price trades above it.
Where Is the Inducement After a Break of Structure?
After a bullish BOS, the inducement is the low of the last pullback inside the leg that closed above the high. After a bearish BOS, it is the high of the last pullback inside the leg that closed below the low. In both cases, the new high or low stays internal until price comes back and takes that level. Every new BOS leg has its own pullback low or high, so the level moves forward with the trend.

How to Mark Inducement Correctly
Marking inducement takes a few checks on one structure timeframe. Work backwards from the most recent break, always looking left.
- Find the last break: the most recent BOS or CHoCH, confirmed by a candle body close beyond an external swing.
- Isolate the leg that made it: from the swing where the move started to the candle that closed beyond the level.
- Find the last valid pullback before the close: the one closest to the break.
- Mark its extreme: the low of that pullback in a bullish leg, the high in a bearish leg. This line is the IDM.
- Leave the line active: it stays in play until price trades beyond it.
If the leg has no valid pullback at all, it counts as a single impulse, and there is no IDM yet. Wait for the next pullback instead of forcing a level.
Wick Sweep or Body Close: When Is the Inducement Taken?
The inducement is taken when price trades beyond it. In a bullish leg, that can happen in two ways, and both count:
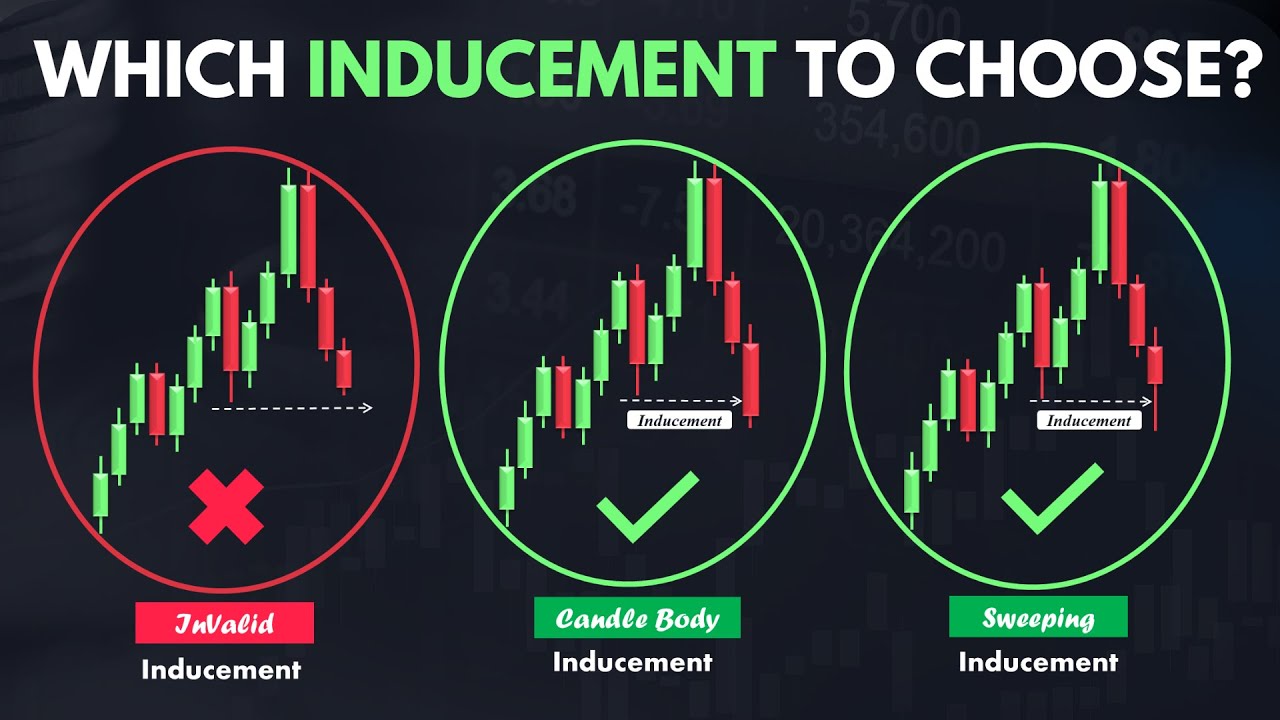
- Body close: a candle closes below the IDM low with its body.
- Wick sweep: a wick trades below that low, and the candle closes back above it, inside the pullback's range.
If price drops toward that low but stops short, with neither a wick nor a close beyond it, the level has not been taken. The whole move is still one impulse leg, and its high is not a major high.
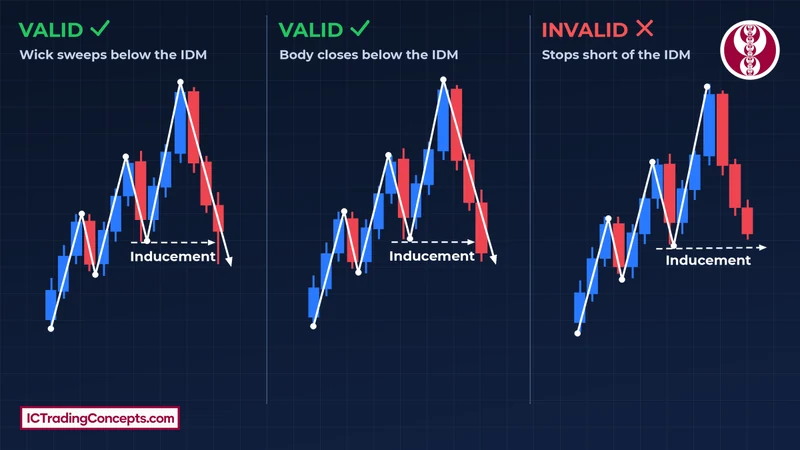
The bearish case mirrors it: a wick or a body close above the IDM high takes the inducement, and a rally that stops below it does not. This is a different rule from the break itself. A BOS still needs a body close beyond the swing, and a wick through a swing is only a sweep.
Why Taking the Inducement Confirms the Swing
Inducement is how SMC confirms that a swing is external. A new high made by an impulse leg starts as an internal high. It becomes an external, major high only after price retraces and takes the IDM.
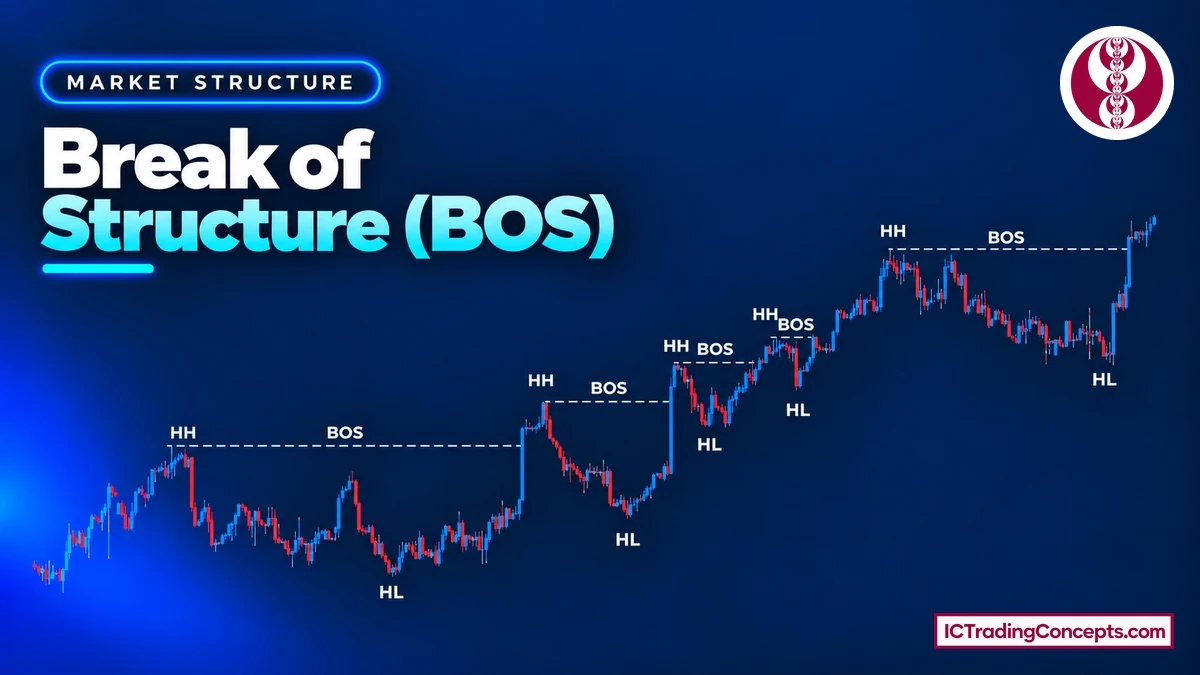
Our guide to break of structure trading already treats a close beyond an internal swing as noise, not a BOS. The inducement model adds a stricter step: until the IDM is taken, a close above the new high is not a BOS either. Without it, there is no confirmed swing, no valid BOS and no valid order block to trade.
Taking the IDM also tends to speed price toward the point of interest. Stop-loss orders tend to intensify a move once a level is crossed, as New York Fed research into market microstructure found, so the stops below the IDM low fuel the drop into the POI. In a bearish leg, the buy stops above the IDM high do the same on the way up to the extreme order block.
Inducement Order Block vs Extreme Order Block
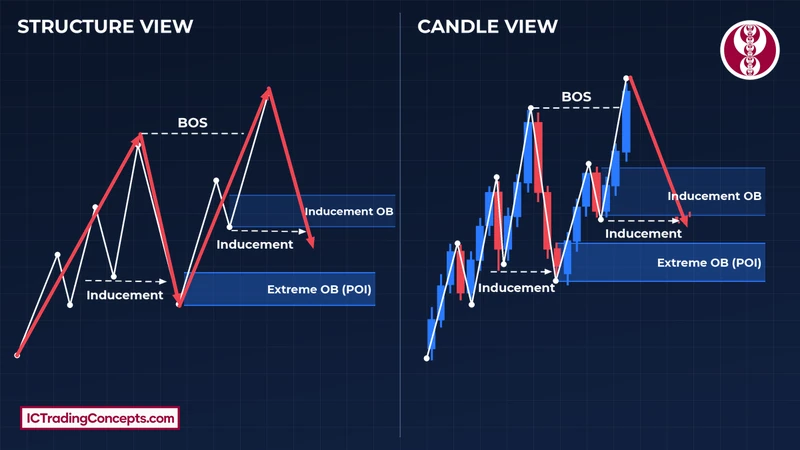
After a break of structure, the leg often leaves two unmitigated order blocks. Both look like valid zones, and that is the trap. The general rules of order block trading apply to both; what differs is where each one sits in the leg.

| Check | Inducement order block | Extreme order block |
|---|---|---|
| Where it forms | At the IDM, the last pullback before the break | At the origin of the impulse leg, beyond the IDM |
| Role | The trap that price is expected to take | The point of interest (POI) |
| When to trade it | Not traded | Only after the IDM is taken |
| Stop placement | Stops of early traders rest just beyond it | The trade's stop goes beyond this zone |
The roles are the same in both directions: both order blocks sit below the new high in a bullish leg and above the new low in a bearish leg. Price is expected to break through the inducement order block and react from the extreme one, as the examples further down show on real charts.
How Inducement Differs From Similar Concepts
Two terms sit very close to inducement in SMC: the pullback itself and the liquidity sweep. Each plays a part in the rule, but neither means the same thing.
Inducement vs Valid Pullback
The valid pullback is the pullback itself: the small correction inside the impulse leg. The inducement is one point on it, the extreme that price must take: the low in a bullish leg or the high in a bearish leg. Every IDM sits on a pullback, but only the last one before the break counts.
Inducement vs Liquidity Sweep
A liquidity sweep is a quick move beyond an old high or low that comes straight back inside. Taking the IDM is a more specific event: a sweep, or a close, of the last pullback before the break. It confirms the swing and opens the way to the extreme POI. A sweep of any other level does neither.
How Traders Use It in Practice
An inducement trading strategy does not enter at the IDM. It waits for that level to be taken and then trades the zone beyond it. The flow below is the same for long and short setups.
- Mark structure and the last break: read the trend and find the latest BOS or CHoCH leg on your structure timeframe.
- Mark the IDM: the low (bullish) or high (bearish) of the last pullback before that break.
- Wait for the IDM to be taken: by a wick sweep or a body close. There is no entry before this.
- Wait for the extreme POI: let price reach the extreme order block at the origin of the leg.
- Optional lower-timeframe confirmation: a CHoCH on a lower timeframe inside the POI, often with a new lower-timeframe order block.
- Place the stop beyond the POI: below the extreme order block for a long, above it for a short.
- Target the external high or low: the swing at the far end of the leg, where the opposite liquidity rests.
The video below starts at 10:24 on a EUR/USD 15-minute chart. It shows a failed IDM, a close that does not count as a BOS, then the sweep and the reaction from the extreme order block.


Inducement Trading Example: Bearish and Bullish
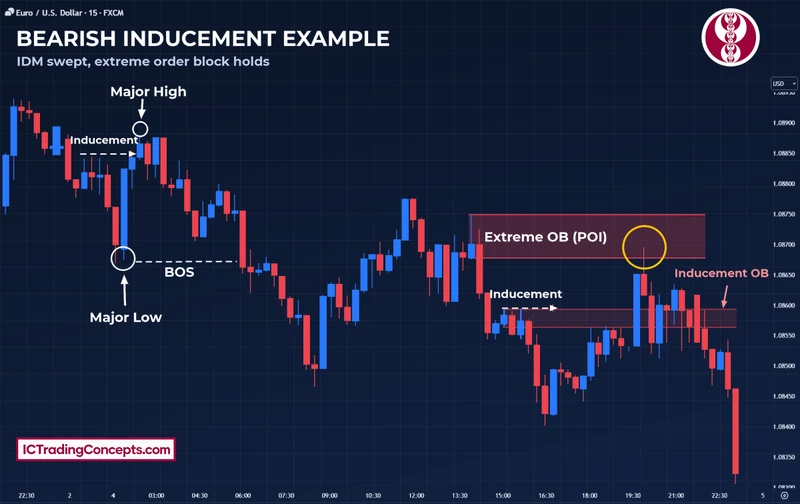
This bearish inducement trading example comes from a EUR/USD 15-minute chart in a downtrend. Price rallies, takes the high of the last pullback and confirms the major low. A body close below that low is a valid BOS, and the high of the pullback right before that close becomes the next IDM.
Price then pushes up but fails to reach that high. The new low is therefore not confirmed, and the next close below it is not a valid BOS. The move counts as one impulse leg, and the IDM moves to the last pullback of the extended leg.
Two bearish order blocks now sit above price. The lower one, at that pullback, is the inducement order block. The upper one, at the start of the leg, is the extreme order block. Price rallies, sweeps the pullback high and the inducement order block, and confirms the low as a major low. It then reaches the extreme order block, turns lower with stronger bearish momentum and prints a new BOS.
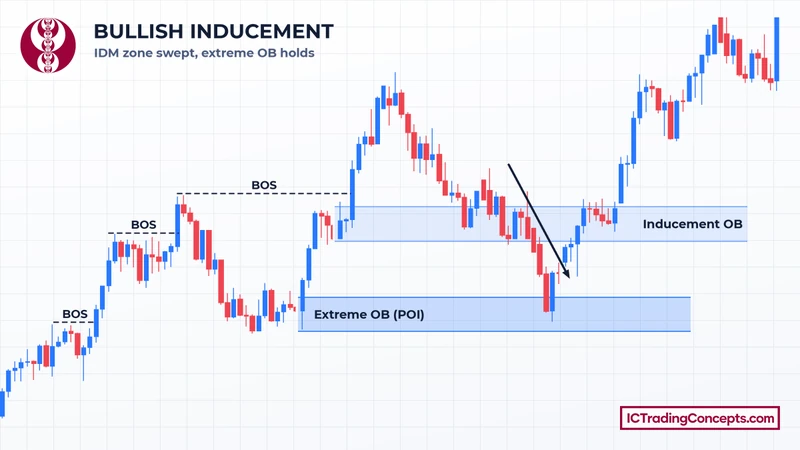
The bullish example shows the same sequence in an uptrend on a 15-minute chart. The rally that broke structure left two bullish order blocks: one at the last pullback before the break and one at the start of the leg. Price fell into the upper zone and paused briefly, which drew in early buyers. It then dropped through that zone, swept the liquidity below it and reached the extreme order block. From there, price turned higher and resumed the uptrend with strong momentum.


Choosing the Timeframe
Inducement follows the same rules on any timeframe, because it is built from swings and candles. What matters is reading the swings, the IDM and the closes on one structure timeframe. A common split uses three layers:
| Role | Typical charts | Used for |
|---|---|---|
| Higher timeframe | Daily, 4-hour | Trend direction and the main structure |
| Structure timeframe | 15-minute | Marking the BOS or CHoCH, the IDM and the extreme POI |
| Lower timeframe | Below the structure chart | The optional CHoCH inside the POI |
Keep the higher timeframe in view. Without that context, almost every pullback can look like an inducement, and the wait-for-the-IDM rule loses its meaning.
Common Mistakes
Most inducement errors come from acting too early or from marking the wrong level.
- Entering at the inducement order block: buying or selling at the zone next to the IDM before that level is taken. That is the zone price is expected to break.
- Calling an unconfirmed break a BOS: a close beyond a high or low whose IDM has not been taken is a close beyond an internal swing.
- Marking the wrong pullback: mark the last pullback before the break, not an earlier pullback in the same leg.
- Treating a near miss as taken: a retracement that stops short of the IDM, with no wick or close beyond it, has not taken it. The leg is still one impulse.
- Placing the stop at the IDM: the stop belongs beyond the POI. A stop at or just beyond that level sits where price is expected to go first.
Inducement Indicators on TradingView
An inducement TradingView indicator can label structure breaks and IDM levels for you, which saves time when reviewing many charts. Each tool uses its own swing rules, so its IDM may not match the level you would mark by hand. Use the labels to check your marking, not to replace it.
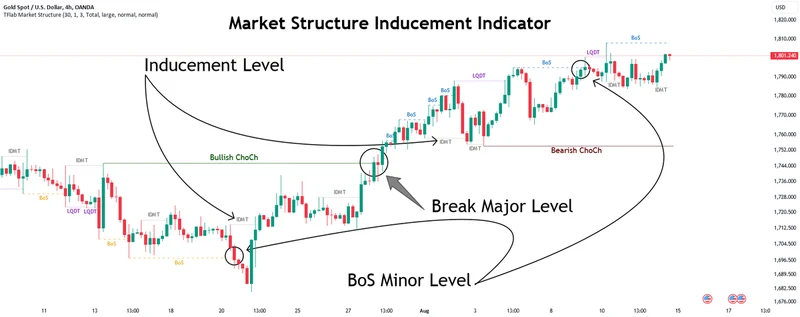
Market Structure Inducements ICT [TradinFinder] CHoch BOS Sweeps
Marks BOS and CHoCH together with pullbacks, inducements, POIs and liquidity grabs, in both bullish and bearish structure.
View on TradingView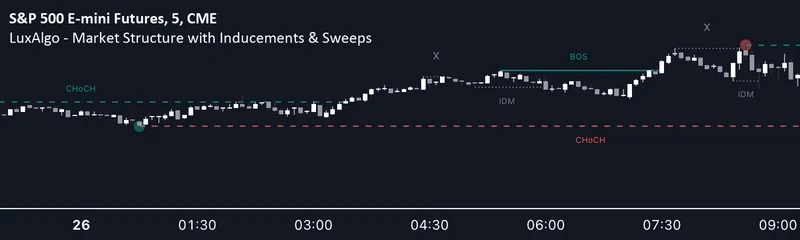
Market Structure with Inducements & Sweeps [LuxAlgo]
Labels CHoCH, BOS and IDM, requires an IDM between structure labels, and marks wick sweeps separately from levels that price closed through.
View on TradingView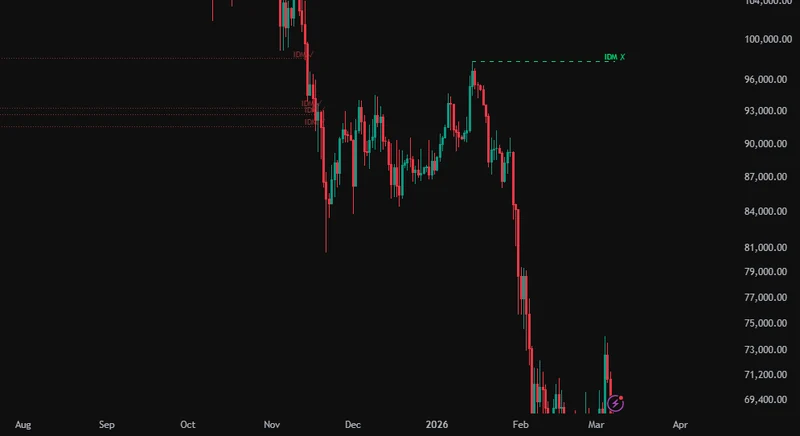
Inducement [UAlgo]
Draws the pullback low or high of the current leg as an IDM line once price resumes the move, and marks the line as swept when price trades through it.
View on TradingViewTest Your Inducement Trading (IDM) Knowledge
Eight questions on where the IDM sits in a BOS or CHoCH leg, how price takes it, why that confirms the swing, the trap order block versus the extreme POI, and where the stop goes. Each answer links back to the section that explains it.
ABCD Answer with your keyboard
-
01In a bullish leg that made a BOS, where is the inducement (IDM)?
The IDM is the extreme of the last valid pullback before the break: its low in a bullish leg, its high in a bearish leg. An earlier pullback in the same leg is the wrong one. Review: What Is Inducement in Trading?
-
02The leg that made the latest break has no valid pullback at all. What does that mean for the IDM?
A leg with no valid pullback counts as a single impulse, so there is no IDM yet. Wait for the next pullback instead of forcing a level. Review: How to Mark Inducement Correctly
-
03Which of these takes a bullish IDM low?
Both a wick sweep and a body close beyond the IDM count. A retracement that stops short, with neither, has not taken it. Review: Wick Sweep or Body Close: When Is the Inducement Taken?
-
04Price closes above a new high, but the IDM of the leg that made that high was never taken. What is that close?
Until the IDM is taken, the new high is still internal. A close beyond an internal swing is not a BOS. Review: Why Taking the Inducement Confirms the Swing
-
05After a BOS, the leg leaves two unmitigated order blocks. Which one is the valid point of interest (POI)?
The order block at the IDM is the trap that price is expected to break. The extreme order block where the leg began is the POI. Review: Inducement Order Block vs Extreme Order Block
-
06How does taking the IDM differ from an ordinary liquidity sweep?
A liquidity sweep is a quick move beyond an old high or low that comes straight back inside. Taking the IDM is a sweep or close of the last pullback before the break, and only it confirms the swing. Review: Inducement vs Liquidity Sweep
-
07In an inducement trade for a long, where does the stop go?
The stop goes beyond the POI. A stop at or just beyond the IDM sits where price is expected to go first. Review: How Traders Use It in Practice
-
08Price pushes toward the IDM but fails to take it, and the leg then extends further. Where is the IDM now?
When the IDM is not taken, the move counts as one impulse leg. The IDM then moves to the last pullback of the extended leg. Review: Inducement Trading Example: Bearish and Bullish
Review your answers
Conclusion
Inducement is the last pullback before a BOS or CHoCH, marked at its low in a bullish leg and its high in a bearish leg. Once price takes it, by a wick or a close, the new high or low becomes a confirmed swing. Until then, the swing is internal, and a close beyond it is not a BOS.
In inducement trading, the IDM tells you where not to enter and what to wait for. Skip the order block at that level, wait for price to take it and look for the reaction at the extreme order block where the leg began. Keep the stop beyond that zone and the target at the external high or low.
Sources
- Research on how currency orders cluster and stop-loss orders intensify moves: New York Fed
- How orders and trading rules shape short-term price moves: Wikipedia
- Valid and invalid IDM, and an inducement walkthrough on EUR/USD 15-minute: Smart Risk, YouTube
- Structure theory and EUR/USD 15-minute examples, from 9:09: Smart Risk, YouTube
Be the first to share your thoughts on this article.